Friday, January 30, 2009

A little harping

Last November, I was contacted by Roosevelt University in Chicago to photograph an upcoming concert of their Symphony Orchestra for their marketing materials. During the conversation, I was warned that other photographers had complained that the lighting onstage was too harsh to get photos with a good tonal range. I told the person who booked me not to worry, I had some exposure and post-processing tricks to overcome those problems. Afterward, I worried that I might have promised too much.

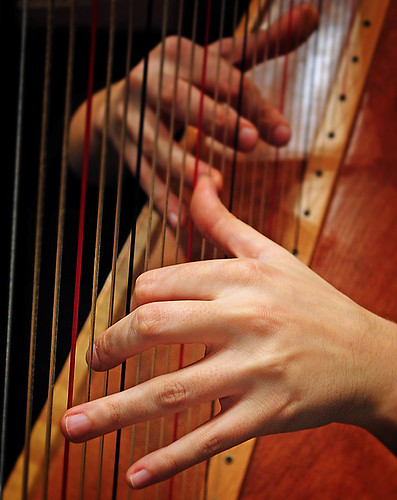
I arrived just prior to the dress rehearsal. I was allowed onstage to take some test shots and make sure I could negotiate the lighting. I needn't have worried. The lighting during the dress rehearsal was exquisite. I took shot after shot of musicians and conductor, wondering why other photographers expressed difficulty. The photo above was taken just before the stage was cleared for the stage crew to set up for the start of the concert. A harpist was tuning up and going through some musical passages. I tried to get a few shots of her hands in action, but her fingers moved so fast that the shots came out blurry. I asked her if she wouldn't mind holding a position for a moment so I could get a couple of clear shots. I got the shots then left the stage. The stage lights were lowered and people began to filter into the auditorium.

Just to be sure about the lighting situation, I located the stage manager and asked if the lighting for the concert would be the same as that in the dress rehearsal. He assured me that it would be. I took my place in the auditorium, content in knowing that the exposure settings I had determined during the rehearsal would not have to be adjusted. One less thing to worry about. The musicians entered and took their places on the stage. The stage lights came up and I began shooting. That's when I discovered that the stage manager lied to me.

Photograph © 2008 James Jordan.

Thursday, January 29, 2009

Ready to rock some Wagner

Last November I had a chance to photograph the Roosevelt University Symphony Orchestra and Concert Choir in action for some promotional shots to be used in the school’s marketing materials. I was allowed onstage during the dress rehearsal before the performance and was given the run of the house during the performance. I even talked my way into the balcony, which was closed to the public that night. It helps to be friendly and polite to the ushers.

This was taken from front center of the balcony during the moment of silence before the piece – a portion from Wagner’s Ring Cycle - began. The crowd is hushed, the conductor has raised his hands and the musicians await the drop of the baton.

For the past 15 years, three of my kids have been involved in music and orchestras – my oldest daughter was a floutist through high school, my youngest son is a jazz studies major and drumset performer working on his doctorate at the University of Illinois and my youngest daughter is a senior studying cello performance at Roosevelt University in Chicago (she’s in the third row of cellos, second chair in). I figure I’ve attended more than 100 concerts and recitals during the last decade and a half. I’m just glad the music gets better the farther the kids go.

Click on picture to enlarge. Photograph © 2008 James Jordan.

Wednesday, January 28, 2009

You know you're getting cabin fever when ...


… the road salt stains on your car remind you of alien worlds in space.

Today’s photo tip from the backwater of the interwebs, designed to improve your flash photography:

Snap whatever reddened soured the cap patch also disseminating the reddened feat nervy - this module enable you to intend a inferior disagreeable winkle gist that whatever flashes yield images with. I aforementioned this digit as it pushes the reddened discover from your winkle in digit directions which crapper advance to a more modify reddened kinda than meet disseminating it - a lowercase more sophisticated.


Translation: Use a white card to bounce your camera’s onboard flash off the ceiling.

But wait, there’s more.

Click on picture to enlarge. Photograph © 2009 James Jordan.

Tuesday, January 27, 2009

You know you're getting cabin fever when ...

... splotches of cooking oil on the bottom of frying pans begin to look interesting.

I don't think we've had more than one day this month where the temperatures made it above the freezing mark. I'm officially tired of winter. It can go away now. kthxbai.

Guess I'm not the only one with cabin fever.

Click on picture to enlarge. Photograph © 2009 James Jordan.

Monday, January 26, 2009

Spotting a sale

One last post on last October's Fall Fest in Sister Bay, Wisconsin. As I walked along after the parade, the boy with the balloon caught my eye and I prepared to get a shot of him. But then the woman in the maroon sweater got my attention as she walked along, eyes never straying from the sales racks lining the sidewalk. Every diagonal line in the scene seemed to be pointing to her so I repositioned to get both her and the boy in the shot.

I've already mentioned that my preferred method for street photography is to carry the camera at chest level and discretely press the shutter with my thumb as I walk along. That's also the basic methodology employed by Joe Wigfall, who describes himself as someone who can "see with his hands" as he works on the streets of New York. Joe was the winner in WNYC's street shot challenge and is an amatuer shooter. For now. WNYC produced a brief video about Joe and how he goes about his photography. You can also check out Joe's photostream on Flickr.

Click on picture to enlarge. Photograph © 2008 James Jordan.

Friday, January 23, 2009

The crowd

Street photography is a term for the act and result of taking candid photographs of people in public places. It takes a certain combination of chutzpah and stealth to pull it off well.

Street photography has been described as holding a mirror up to humankind. The best street photographs capture people exactly as they are, with no primping, posturing or pretension while delivering some sort of statement on the human condition.

I’ve only dabbled in street photography. My preferred method is to walk through a crowd with my camera hanging from a strap around my neck. With the camera at chest level, and my wide angle zoom set as wide as possible, I walk through the crowd with my thumb on the shutter button. When I spot someone interesting, I’ll push the shutter. It’s a little hit and miss, but after a while, you can get pretty good at guesstimating what will appear in your photo ahead of time. And shooting with a wide angle lens gives you ample room to crop afterward.

The above photograph was taken after the Fall Fest parade in Sister Bay, Wisconsin last October. After the parade had ended, I walked the mile and a half or so back to my car with my camera hanging as described above. I just pressed the shutter button as I encountered interesting looking people. This is an example of northern Wisconsin street photography. Where else would you see a kid in a knit cap that makes him look like a cow?

If you’re interested in seeing more street photography, check out these images from the “Streets in Color” group on Flickr. If you’d like to see Bruce Gilden, a man who makes a living from street photography, working a New York City crowd with his in-your-face style of shooting, check out this video.

Click on image to enlarge because you just gotta see this picture big. You know you want to. Photograph © 2008 James Jordan.

Thursday, January 22, 2009

The kid

Taken at the same Fall Fest parade as "The Colonel" last October. Before the parade, people milled about in the street, chatted with friends, staked out their places and generally bided their time until the parade began. I milled about taking pictures.

Over the crowd noise, I heard a man giving instructions to a young child about 20 yards down the street. The boy was not paying much attention to his father's repeated requests to stay close to the rest of the family. The reason being that the lad had become intrigued with the yellow line that ran down the length of the street and seemed intent on walking along the stripe.

He started walking down the line toward me, still ignoring his dad's requests to come back. He looked down the entire time, concentrating so hard that he blocked out the people around him. I knelt down on the line and kept focus on him as he approached. He was right on top of me when he stopped and looked up, tongue still sticking out from his concentrated efforts.

After the click, the boy scurried back to his dad, who had watched the entire scene unfold and laughed at the lesson delivered by "the guy who took your picture."

Click on picture to enlarge. Photograph © 2008 James Jordan.

Wednesday, January 21, 2009

The Colonel

Taken at the Fall Fest parade in Sister Bay, Wisconsin last October. This distinguished looking gentleman was the grand marshal of the parade, riding at the front of the procession in a military jeep.

I was kneeling on the street at the front of the crowd and had my camera trained on him (55-200 lens at full zoom) and was ready to shoot when someone standing behind me and slightly left called to him. He turned and I snapped just as he spotted and recognized the person calling his name. I like the mixture of expressions at this moment - his eyes searching and finding with the faintest hint of a smile beginning to emerge. The green beret, decorations and lines in his face would probably provide a very interesting story.

Post processed in Photoshop Elements with Shadow and Highlight adjustment (which I believe corresponds to curves in full blown Photoshop - PSE just doesn't show the curve while adjusting - someone correct me if I'm wrong). Color desaturated a tad and unsharp mask applied.

Click on picture to enlarge. Photograph © 2008 James Jordan.

Tuesday, January 20, 2009

Blue ice

The old frost-on-the-windowpane photograph. Shot in daylight with white balance set on incandescent to bring out the brrr.

Click on picture to enlarge. Photograph © 2009 James Jordan.

Monday, January 19, 2009

Exploring the pasta-bilities

After last Friday's freeze-out, my wife and I sought some warmth for body and soul. We found a measure of it in the kitchen. For some time, she had wanted to explore making homemade pasta, and, in the aftermath of getting our funky furnace fixed, it seemed as good a time as any.

Let me just insert a note here to say that I like to cook. I liked the Food Network before they added all the pretty people with marginal cooking skills as hosts. I enjoyed the movie Ratatouille for the kitchen scenes, which kind of made up for the sappy storyline. And, because a certain food blog I read every now and then also features some excellent food photography, I decided to document our fun with farina.


We prepared some dough according to a recipe my wife found online (dark spots in the dough are basil flakes), I did the rolling and sliced the dough with a pizza cutter into 1/4-inch strips, then into a boiling pan they went. I grabbed the camera in between steps to document our progress.


Photos taken in available light (a mix of daylight and incandescent) with the camera's white balance set on incandescent. Images layered with Soft Light, shadows lightened, unsharp mask and warming filter applied in post-processing. 50mm 1.8 lens.

Click on pictures to enlarge. Photographs © 2009 James Jordan.

Friday, January 16, 2009

Brrrrr!

Screen shot of a portion of my computer desktop this morning. Note the temp. The furnace decided to go on strike early this morning. Great timing. About 50 degrees in the house at the moment. Waiting for a return call from a repair guy.

Plumbing is working OK. Got that going for us.

UPDATE: Four hours later, the house is heating back up. Repair guy cleaned a sensor in the furnace and off it went ... until it quit again about a half hour after the repair guy left. Amazing how fast the temperature in a house can plummet on a day like today. He came back an hour later and cleaned more stuff. Seems to be working fine now. Fingers able to type again. I appreciate the offer from n8. We weren't in too much peril ... yet. Another couple of hours with no heat, and it might have been a different story.

Thursday, January 15, 2009

I'm looking for a word that rhymes with "door hinge"

Probably the last "After and Before" combo that I'll post for a while. They'll all be "Afters" after this. Can you guess how I went from the bottom photo to the top? You can review previous posts on the topic of layering in Photoshop, or just cheat and read the next paragraph.

Selected all and pasted over the original. Selected Soft Light in the Layers menu. This really brought out the details in the rind and surface of the fruit. Used the Elliptical Selection Tool to lasso the ball of fruit, feathered and inverted the selection, then darkened the background in the Levels menu. Placed a blue filter over everything because the color was a little too intense. Ran an Unsharp Mask to further enhance the details.

Mmm. Juicy.

UPDATE: I lied about this being the last "After and Before" that I'm going to post. Tomorrow I'll show you how to make portraits pop using the same layering techniques. For a sneak preview, head on over to Flickr.

Photograph © 2009 James Jordan.

Wednesday, January 14, 2009

Winter wave

A snow drift with the shadows of tree branches forms an abstract pattern of whites and darks. That's what I saw. Jacques Daigneault, a viewer of this photo on Flickr, saw an icy wave. So, at his suggestion, I retitled this photo "Winter Wave" from the original "Winter Abstract."

Post processing: Layered, blended with Soft Light, levels adjusted and Violet filter applied. A big old baddy Unsharp Mask at 400% and 1.0 radius brings out the bling and makes it sing.

Click on picture to see it embiggened. Photograph © 2009 James Jordan.

From OK to WOW

If you've been following my series on post-processing digital images, you might be interested in a recent blog post by professional children's photographer Kelly Ferreira. She walks through her thought process while photographing her two daughters, and provides plenty of examples and before-and-after shots along the way.

The dark side of Door County

Nearly three years ago, as I began exploring photography after sunset and by moonlight, I hatched an idea. Why not photograph one of my favorite places on earth in the dark hours? Door County, Wisconsin is a place of rugged beauty, and there is something about being out and about under the cover of night that enhances that ruggedness and invokes memories of days long past.

So over the course of the next three years, I slowly built a collection of images taken between sunset and sunrise. Some are lit by the fading light of day, some by the reflected light of the moon. Most of the subjects are familiar tourist stops, but when viewed in darkness are cast in an entirely different light, so to speak.

A visit to Door County is not complete until my wife and I have stopped at a combination coffee shop and art gallery in Gills Rock. The coffee is superb, the baked goods are mouth watering and the artwork in the adjacent gallery is always a visual treat.

On our last visit in October, I struck up a conversation with Charlene, who runs the gallery (and provides bakery items for the coffee shop, operated by her husband Dewey). We talked about how she goes about selecting artwork - what types of art she is looking for, timeframes for submissions, etc. When she mentioned that she would be reviewing artists between November and January, I pitched my collection of "Door After Dark" images. She encouraged me to submit some samples for consideration and handed me some printed instructions and information.

I mailed a CD of images to Charlene in November. This week, I received a letter informing me that all ten images I submitted have been accepted. I'll deliver framed prints in April and they will hang in the gallery from May through October of this year, along with the work of several other artists.

So if you're passing through Gills Rock this summer/early fall, stop by Charlene's Gallery Ten for a cup of coffee, a slice of pie and some visual art on the side.

Click on picture to enlarge. Photograph © 2009 James Jordan.

Tuesday, January 13, 2009

Art imitates art

I made this picture in March of 2006. Since then it's racked up several thousand views here and at Flickr, and has been used to illustrate Web articles on everything from mad cow disease to tainted milk.


Last night, a commenter at Flickr marked this photo as a Favorite and mentioned that it reminded her of the work of an Australian impressionist painter of the early 1900s. I had never heard of him or seen his work until now. But there are some interesting parallels in the two works of art.

Who knew? I guess there's nothing new under the sun of a frosty spring morning.

Photograph © 2006 James Jordan

Monday, January 12, 2009

After and before #3

I love old barns. It was a photographic treat to have one at my disposal at a local forest preserve.

I'm giving away more post-processing secrets today. The two photos above show what a little effort in Photoshop Elements can do for your pictures. The bottom photo is what came out of my camera. The contrast between the stone wall, red barn and white snow resulted in a pretty good picture. But are we satisfied with pretty good when we can have fabulous? No!

I started out as I did with this photo - I copied the photo and pasted it as a layer over the original. Only this time, I skipped the High Pass and inverted the layer (Select All/Filter/Adjustments/Invert), which created a negative image. Then I selected Soft Light in the Layers dialog box. Hello, snowy details! I played with the Opacity setting slider until I was satisfied with the look - I wound up at just above 50% opacity.

Before I flattened the image, I selected the barn and stone fence with the Polygonal Lasso Tool, added an 8-pixel feather and deleted them from the layer, exposing the barn and fence from the background layer below. I then flattened the image, cranked up the color saturation about 15% and applied an Unsharp Mask at 200%, 1.0 Pixel and 0 Threshold.

I then added a faint vignette - I used the Elliptical Marquee Tool to select nearly the entire photo. Feathered the selection at 240 pixels, then inverted the selection. Went to Enhance/Adjust Lighting/Levels and slid the right Output Level slider to 220, which darkened the edges of the photo slightly. I then added some soft blur (Filter/Blur/Gaussian Blur at 8.0 pixels).

The inverted layer/Soft Light combo is a great way to recapture details that might have gotten lost in the shadows and highlights of your pictures.

Photographs © 2009 James Jordan.

Friday, January 09, 2009

After and Before #2

Seeing the Forest Through the Trees This was taken during a recent walk through a forest preserve not too far from my home. I liked the various angles of the pine trees and the pathway lined with stalks of grasses and weeds leading to the wooded area in the background. It would have been very inviting had the day not been freezing cold and the path icy. Maybe another day.

This is another installment of "After and Before." Here is the original image, straight from the camera:

Yeah, I know. Ugh. Here's what I did to fix it in Photoshop Elements:

1. Selected Enhance/Lighting/Shadows and Highlights. Set the sliders thusly: Lighten Shadows 25%, Darken Highlights 6%, Midtone Contrast +17%. Nothing too magical about those numbers. I just liked the resulting "pop" that those settings provided.

2. I ran the photo through Enhance/Unsharp Mask. I've posted a brief tutorial on using Unsharp Mask on my photo advice blog, Ready, Aim, Click. If you want to get good at editing pictures, it's just something you gotta know. I used my default settings (also listed on RAC).

3. Selected Enhance/Color/Hue and Saturation and set the Saturation at +30%. Ooooh.

4. Then, just because I like it, I ran a violet filter on the photo - Filter/Adjustments/Photo Filter/Violet/Density 25%. It just seems to add a bit of winter chill to the image.

That was about it, other than using the Clone Tool to clean up some goop in the foreground snow.

Click on pictures to enlarge. Photographs © 2009 James Jordan.

Thursday, January 08, 2009

After and before

By now, you've probably figured out my modus operandi when it comes to photography - "If there's a way to do it cheaper, why not?" I spent most of last year taking photos with a $200 point and shoot digital camera to see if that camera could compete on an image quality level with the big guns. It can, to a point, but I think that point is pretty high on the quality scale.

Getting more serious about my photography later in the year caused me to collide with the limits of that camera, so I made the jump to a digital SLR. I've used the dSLR for four months and I'm already colliding with the limits of that camera. But that's another story.

Half of digital photography is taking the picture and the other half is making the picture in a photo editing program. IMHO very few digital pictures come right out of the camera ready to be displayed to the world. So which photo editing program do I use? Refer to my modus operandi. I use Adobe Photoshop Elements 6, a $79 package that does a lot of the things that its more robust (and expensive) cousin, Photoshop Creative Suite (minus all the other graphics/design programs that come with it) can do. Or at least that's what I'm trying to prove this year.

I shot a number of images on snowy days over the past couple of weeks, in which I discovered the limits of my dSLR, namely, it doesn't do so well in high-contrast situations, like, oh, let's see ... snowy days. The images that come out of the camera need help. In some cases, the images are beyond help (read purple fringing). Hello, recycle bin.

Anyhoo, over the next several days, I'm going to highlight some of those snowy photos, the good, bad and ugly and some of the actions I took in PSE to adjust those photos, featuring them side by side, "after" image first, then the original "before" image as it emerged from the camera.

Anyone who is not into post processing or does not own PSE can stop reading now. Everyone else, here is how the above image was processed: The image was opened, Select/All (ctrl+A) and copied (ctrl+C). I then went to the Effects menu and chose High Pass (the little gray apple picture if you're using the visual menu), applied it and slid the adjustment slider all the way to the right and clicked OK. I then selected Paste (ctrl+P), which placed the original copied image on a layer on top of the picture I just adjusted. I went to the Layers menu box, clicked on the bar that said "Normal" and selected "Soft Light." Clicking on the two right facing triangles on the right side of the Layers bar brings up a menu. I selected Flatten Image to merge the two layers into a single image.

I then selected Enhance/Adjust Color/Adjust Hue and Saturation and slid the saturation slider to about +35% then hit OK. Then I selected Filter/Adjustments/Photo Filter and selected the violet filter and set the slider to 35% then hit OK.

The photo was pretty much finished at this point, but I played with the levels (Enhance/Adjust Lighting/Levels) a bit, then added the lens flare as an accent (Filter/Render/Lens Flare - 35mm Prime at 50% and moved the crosshair into position and clicked OK).

Working with layers is what set Photoshop apart from the crowd back in the days when digital photo editing was in its infancy. Getting the most out of PSE requires some facility with the Layers menu. So copy and paste some layers in your pictures and play around to see what happens.

Photographs © 2009 James Jordan.

Wednesday, January 07, 2009

Winter pine

I snapped this photograph of a pine tree while pining for spring and better days ahead. According to this web site, "pine," the tree, comes from the Latin "pinus," which is related to an earlier Indo-European word meaning "resin" or "sap," which pine trees possess in abundance.

"Pine," the act of longing intensely, comes from the Latin "poena," meaning "punishment," which also gave us "pain" and "penalty."

No doubt that the times are doling out pain, punishment and penalty a-plenty these days. Yet in all of the ugliness, there are still pockets of beauty here and there, a bit of warmth despite the bitterly cold winds that sting.

Click on this post's headline for image exposure data. Click on picture to enlarge. Photograph © 2009 James Jordan.

Tuesday, January 06, 2009

Not even pictures are safe anymore

WASHINGTON - The U.S. Bureau of Standards announced today that due to the general slowdown of the economy, a picture is now worth only about 800 words, down from its longtime level of 1,000 words.

"It's an indictment on the economy as a whole when something as dependable as a picture can be devalued by 20 percent," stated Frank Carlisle, director of the Bureau of Standards' metaphor division. "We were caught off guard entirely. There are critics who believe we should have seen it coming when a bird in the hand dropped to 1.73 birds in the bush, but hindsight is 20/15."

Many within the photography industry are calling for government intervention to pump a fresh influx of words into the system to shore up a picture's worth, but many policy makers are taking a wait-and-see attitude. "You can't just rush in to shore up leaky numerical metaphors without some assurance that their long term management will correct the problems that caused their devaluation in the first place," said a high ranking official in the Library of Congress.

"In situations like this, a miss is as good as 4500 feet," stated the official. "When a stitch in time plunged to saving only seven and a half, the sewing industry managed to right itself and the current rate of 8.875 stitches saved is now back to right around the established high water mark."

The Bureau of Standards offered no timelines for a picture's worth to rise back to its former level. "Until a picture recovers its word-to-image ratio, we suggest using 1.2 pictures in place of just one," said the Bureau in a statement released shortly after its initial announcement.

Photo and bogus news story © 2009 James Jordan.

Three million turns make a straight line

The shortest path between two points may be a straight line, but that only works in theory and makes for a lousy story. Life is more complicated. The straightest path is still a series of turns - some small, some big – on the way to the destination.

Hope you’re negotiating those turns successfully today.

I been blogged: One of my photos has been grabbed to illustrate a post that advocates starting a journey in a big way.

Photo: Turn on a rural road in winter fog. Click on picture to enlarge. Photograph © 2009 James Jordan.

Sunday, January 04, 2009

Winter fog

This photo was taken at a local forest preserve on a foggy winter day in late December. The day had begun with patches of dense fog and I set out to see what photo possibilities would present themselves to me.

I pulled into the parking lot which was empty except for a county sheriff's car with two deputies sitting inside. Feeling extremely self conscious, I managed to make a couple of shots without leaving the parking lot, then packed up and left.

I'm not sure what they were doing in an otherwise empty forest preserve on a foggy winter day. They were probably wondering the same thing about me.

Post processing details, for those who dig this kind of stuff: High Pass effect added with Photoshop Elements 6, levels adjustments, violet filter applied at 35%. Vignette added with elliptical selection tool, feathering and levels adjustment. Click on picture to enlarge. Photograph © 2009 James Jordan.

Friday, January 02, 2009

New Year's Day 2009, Forrest, Illinois

Took a New Year's Day trip to Urbana, Illinois to visit my two college kids. On the way, I watched the constantly shifting clouds swirl and twist overhead (while keeping one eye on the road). At one point, I told my wife we had to pull over so I could get a shot of the sky. Since we were on a busy state highway, I waited until we came to a cross road and turned off to park.

At the corner sat some debris - old tires, cable, bottles. I quickly framed a couple of shots and made several exposures for the sky and foreground and hopped back into the car. It was freezing cold and very windy - very miserable weather despite the sunshine.

Later in the warmth and comfort of home, I looked at what I had shot. One composition appealed to me so I combined two shots, one of the sky and one of the foreground into a single image. I played with shadow and highlight levels, color saturation and contrast until I arrived at the image you see above.

Order and disorder side by side on the first day of the new year.

Click on picture to enlarge. Photograph © 2009 James Jordan.

Thursday, January 01, 2009

In with the new

I woke up this morning to a new year. On the surface, it looks a lot like the old one. But I'm not letting that fool me. There are brand new treasures hidden throughout the landscape, waiting to be uncovered.

Hoping that you wind up with many baskets full this coming year.

Click on picture to enlarge. Photograph © 2009 James Jordan.