Showing posts with label Light. Show all posts

Wednesday, September 08, 2010

Storm is over

Storm is over

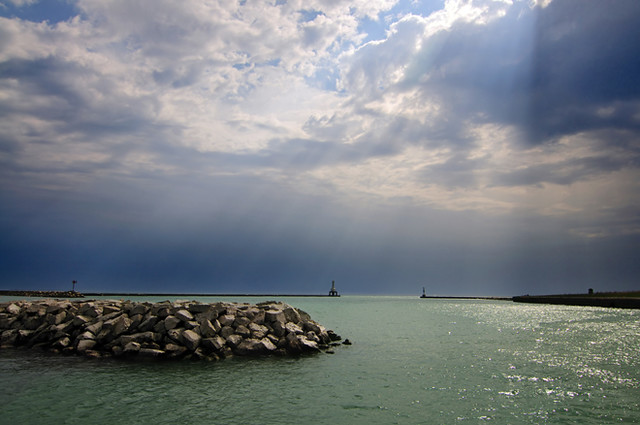
Drove through a very heavy thunderstorm on the way home from Wisconsin on Labor Day. Torrential rain, lots of lightning. As my wife and I approached Port Washington, the rains lightened as the tempest headed out over Lake Michigan. We drove to the Port Washington harbor to see what we could see.

What we saw, just for a few moments, was the sun breaking through the clouds and casting rays over the harbor. Some large drops of rain were still falling as I fired off a half dozen shots. The tricky thing about this kind of shot is to make sure you've exposed properly, otherwise, you get blown out areas of pure white, and nothing in post processing can adequately fix those. I'd fire a shot, take a peek at the image's histogram and note with dismay the large areas of pure white, make an adjustment, meter on a bright but not too bright area of the scene and fire again, all the while hoping the magical view stuck around until I got it right.

Number six was the charm. And then the scene disappeared.

In post processing, where I only adjusted levels, I noticed that the dark areas of the image were riddled with small white spots. I thought to myself that I must have done something to mess up the camera's sensor while changing lenses in the rain. Great. I checked other images taken after this scene, and strangely enough, the spots weren't there. What was up?

It was only after I had meticulouly removed each and every white spot that I concluded that the spots were backlit drops of rain. Oh.

Maybe I should have left them in.

Photograph © 2010 James Jordan.

Wednesday, May 12, 2010

In the woods

In the woods 3

I love the dappled light of the woods. Pools of light. Puddles of shadows. The name of the game while walking a trail at Starved Rock State Park near Utica, Illinois was "isolation." Could I find interesting looking subjects, then use available light and shadow to make then stand out from their surroundings?

In the woods 1

In a lot of cases, yes. In many more, no. But it was fun to see if I could turn light, shadow and subject into an image that would make someone want to look twice.

In the woods 2

Photographs © 2010 James Jordan.

Wednesday, March 03, 2010

A light on the veranda

Light on the veranda

Some architectural detail from the Ellwood Mansion in Dekalb, Illinois.

Isaac Ellwood was a barbed wire baron in the late 1800s/early 1900s. He made his fortune the old fashioned way -- he took someone else's idea, bought a share of it and proceeded to buy out all his competitors.

Ellwood did improve the process of manufacturing barbed wire and his company successfully sold millions of pounds of the stuff to western ranchers who were initially skeptical that two pieces of wire with a little bitty barb wound in could hold back a Texas longhorn. It did very well, thank you and so did Ellwood and his partners.

I love the styling of the lamps hanging from the porch that wraps around the Ellwood mansion. You'd expect a barbed wire man to have pointy things around his house.

Photograph © 2010 James Jordan.

Monday, February 22, 2010

Winter light

Winter light

It snowed last night. No surprise. It's the Midwest and it's late February. It happens.

I took advantage of the fresh blanket of white stuff to get out and do some shooting this morning. Other than a few small woodland critters, mine were the first footprints in this neck of the woods. Nice. Quiet. Just me and a light breeze.

Took some straight shots with available light. Then got out the flash, a stand, a couple of warming gels and a wireless trigger and set out to play with the possibilities.

I trekked into the middle of this trio of pines and set the light stand behind the middle tree. Set the camera to Incandescent white balance to turn things a tranquil blue. Erased the legs of the light stand and my footprints into the tree cluster in post.

More snowy magic to come.

Photograph © 2010 James Jordan.

Tuesday, January 05, 2010

Sophie, the Chinese Foo Dog

Sophie, the Chinese Foo Dog

Meet my brother's pug, Sophie. Or as David Letterman refers to the breed, Chinese Foo Dog. I had been wanting to try my hand at pet portraiture, but the offerings are limited at my house. Our cat passed away last August and our tropical fish don't come off as warm and cuddly. Go figure.

My wife and I spent a couple of days in Lansing, Mich. over the holidays visiting family. I brought my portable lighting kit along with me hoping to score a sitting with the Divine Miss S at my brother's house. Keep in mind that my portable lighting kit comes in several large bags and opens up to fill a 12x15 room. Everything's portable if you have vehicle big enough to move it, I guess. I brought it along just in case, but wasn't going to bring it out if I didn't have to.

Sophie, the Chinese Foo Dog

Day 1, I took some available light snapshots of Sophie as she wandered about the house, just to get a feel for how she would come off on camera. The first thing I noted was that her little wrinkly black face really sucked up the light. I'd have to get the light kit out of the back of the car to do her justice.

Day 2 was portrait day. Set up a chair in the entryway to use as Sophie's throne. I decided on using two lights. One with an umbrella choked up about halfway up the handle. I wanted soft light but wanted it concentrated on her face from the left. I aimed the light at the front of the chair to further achieve the goal. A second light with a grid to provide harder directional light was placed opposite the first flash to cross light Sophie and bring out the wrinkles in her face. I also set up a large white reflector just out of the frame to the right to throw any more light I could at her.

Once the lights were set (my brother has a life-size ceramic pug that served as a stand-in while I adjusted the levels of the flashes), the star was brought in. I shot far and close, and from different angles. She worked the camera like a pro. She went from aloof to pensive to disinterested with ease. Sometimes all in the same shot.

Sophie, the Chinese Foo Dog

Even with the barrage of light, I had to make some adjustments to Sophie's muzzle in post to bring out the details and make sure her eyes didn't get lost in the surroundings. Lots of work at both ends of the process, but it worked out pretty well.

My mother says that the markings on a pug's forehead resemble Chinese numerals. A seven on a pug is said to bring good luck. Sophie has a six. Close enough.

I know there's at least one fan of pugs who visits here. Enjoy.

Photographs © 2010 James Jordan.

Thursday, December 17, 2009

River

River

Missing someone this Christmas? Yeah, me too.

Photograph © 2009 James Jordan.

Thursday, December 10, 2009

Snowman (with bokeh background)

Let it bokeh, Let it bokeh, Let it bokeh,

Christmas is the season of lights (oops, I mean the holiday season is the season of lights), and I can channel my inner Clark Griswold and light up the house like nobody's business. I can also play with out-of-focus circles of lights because there's just so many lights to make out-of-focus.

Bokeh is a photographic term used to describe the quality of the out-of-focus background produced by any given lens. You can get a thorough explanation here.

This photo was lit with a single strobe camera right. White reflector placed just off-camera to the left to add fill to the shadows. Silver reflector used to throw more reflected light onto the dark hat of the ceramic snowman (oops, I mean person of snow).

Photograph © 2009 James Jordan.

Monday, November 30, 2009

Make-A-Wish Monday

Make a wish 2

Fun with a wishbone left over from the Thanksgiving festivities. Yeah, it's kinda small -- we served cornish game hens with a wild rice stuffing. Mmmmm. Anyway, I thought I could do some photographic-type stuff with the bone and try out a new set of flash grids in the process.

The photo above has the flash set at 1/32 power with a 1/8 inch grid attached. The grid creates a strong directional light that wonderfully outlines a subject when placed perpendicular to the camera-subject axis. A sheet of white foam board is standing just out of the frame to the right to reflect some light back onto my fingers.

Make a wish 3

Same flash setup as above, only this time the flash is pointing directly down at the subject and is about 2 inches away. This time the grid creates a circle of light with a graduated falloff to black. Both this photo and the one above were shot at or on my dining room table at night. Normal room lighting was on the entire time -- I simply adjusted aperture down and shutter speed up to turn the ambient light to black and let the flash do all the work. No need to make the family sit around in the dark while I fiddled with some shots.

Last photo also taken at the dining room table. Afternoon sun is coming in through the window blinds behind me. White foam board propped up to catch the slats of sunlight and reflect some of it back onto my hand.

Make a wish 1

Here's wishing you a good Monday.

Photographs © 2009 James Jordan.

Wednesday, November 25, 2009

Home is where the hearts are

Heart lights

Have a Happy Thanksgiving. There's a lot to be thankful for.

Photograph © 2009 James Jordan.

Thursday, October 15, 2009

From soft to scary

One-light portrait

Wal-Mart has the right idea, kinda. I passed the photo studio in a local Wally World and stopped a second to check out their setup. One huge softbox with a jillion watts of light hanging seven feet in the air directly over the camera. That was it. A nice one-size-fits-all lighting solution. Except we all know that one-size-fits-all doesn't. If you have nice tight clear skin, Wal-lighting will make you look like a million bucks. For the rest of us in the 90 percent who aren't blessed that way, such light only enhances our shortcomings. But I digress.

The child portrait above employs the one soft light approach, except I chose to move the light low -- the bottom of the umbrella was set to about the child's height and placed slightly to the left. A reflector was laid on the floor just in front of the model to throw a little bit of light under his chin.

Having been a natural light kind of a guy for so many years, playing with multiple strobes, umbrellas, reflectors, gels, snoots and grids is a whole new ballgame. Sometimes it can be downright scary ...

Boo

Now, off to get my morning coffee. I can be such a monster without it.

Bottom photo: Three strobes - two LumoPro 120's set as optical slaves on stands behind me left and right, 1/16th power. One strobe on camera with a diffuser. ISO 200, f/5.6, 1/80th. Five image HDR from a single RAW file. Photographs © 2009 James Jordan.

Wednesday, October 14, 2009

Looking to the future

Looking into the future

As promised, much better looking subjects in my subsequent strobe-at-night photos. This is from Thip and Suli's engagement photo session. Great couple, fun and energetic in spite of the cold temps. My wife assisted, acting as the equipment bearer and steady-er of the light stand, because the wind can play havoc with an umbrella. Who knew?

At the gates

We started by wandering around Festival Park in downtown Elgin, Illinois then moved to the Riverwalk on the Fox River, stopping at interesting locales to shoot a few photos of the couple.

Da bling

The top shot was taken at the Elgin Riverwalk's overlook of the Fox River dam. Light stand and wife was just out of the picture to the right. I was on the level below the overlook with camera tethered to the light via a 16-foot cable draped over the retaining wall from above. Someday I gotta get me a wireless flash trigger.

Buss and bokeh

The final shots were taken from the overlook. I joined everyone back at the top to get catch some city light action behind Thip and Suli. Then it was time to head home and thaw out.

Photographs © 2009 James Jordan.

Tuesday, October 13, 2009

Self portrait with garage and driveway, 6:30 a.m.

Self portrait with garage and driveway

So why am I taking pictures of myself in my driveway at 6:30 in the morning? Because I can, that's why. Actually, I have an engagement photo session this evening and want to try out some off-camera strobe-assisted shots of the happy couple in an urban setting around sunset. So I'm using myself as a guinea pig to test some lighting setups.

I'll be working simply -- one strobe with an umbrella on a stand, balancing flash with ambient light. Shooting pictures of myself over the last couple of days in different scenarios has helped me to be able to quickly determine my camera settings when faced with a tricky lighting setup. This shot, which includes interior and exterior house lights, a strobe and the pre-dawn sky, took just three shots and adjustments to balance. It has also helped me to come up with a routine to quickly set up, tear down and move the strobe/umbrella combo from location to location. I may even try something in the middle of the street at a crosswalk.

And I'll have better looking subjects to work with.

Photograph © 2009 James Jordan.

Wednesday, October 07, 2009

Flashy fingers

Flashy fingers

Experimenting with a two-flash setup combined with ambient room light as the third light source.

Not easy to do when you are both the model and the photographer. Used a light stand to mark the focus point. Set the camera's self timer and situated myself so my left hand was in focus. Played a little riff while the timer counted down. Chimped the shot on the camera's LCD, reset lights and camera settings as needed and started all over again.

Flashy, huh?

Photograph © 2009 James Jordan.

Sunday, September 20, 2009

Embracing the backlight, or how I lost my fear of blown out backgrounds

Study in backlight 1

I admit I've suffered from OCD when it comes to avoiding the bane of digital photography -- blowouts. Areas of pure white in an otherwise nicely exposed photo slap me in the face and force me to look -- and once I do, I can see nothing else in the photo. Nowhere is the blown out highlight more evident than the backlit photograph. I would either A) try to avoid situations where the light was behind my subject or B) become faniatical about checking the highlight mode of my LCD display. I'd dial down the exposure until every last black blinkie disappeared, then hoped that I could recover the remains of the shadows later in post processing.

I'm a whole lot better now. It all started while photographing guests arriving at a wedding a couple of weeks ago. I stood on a covered walkway, bouncing a flash off the white "ceiling" to throw some light on my subjects. One couple stopped in a pool of sunlight and I fired. The result was one of those "I think I'm on to something" moments. The couple were lit perfectly by the flash in front of them. Behind them, the background glowed. Their shadows were thrown forward. The effect was cool. From that point on, I waited for arriving guests to reach the pool of sunlight before I clicked the shutter.

Study in backlight 4

Fast forward a couple of weeks. I'm shooting some street photos at a fall festival. I'm walking up the street into the morning sun and people are coming at me. I remember the "ain't it cool" photos I shot a couple of weeks earlier. I set my exposure value to +2 to compensate for metering into the sun, set a manual focus to about 5 feet in front of me, selected an aperture of f/8 for moderate depth of field and fired away whenever I saw someone who looked interesting in front of me.

Study in backlight 2

Study in backlight 3

The effect is graphic -- everything in shadow looks normal. Everything else is transformed to almost pure white. Shadows reach out from the subjects toward the camera. Complex scenes are simplified.

Study in backlight 5

Photographs © 2009 James Jordan.

Wednesday, September 02, 2009

Shy hopper

Shy hopper

Now that we've made the turn into September, it will only be a matter of a couple of months before we say goodbye to our exoskeletoned friends. So I thought I'd close out a summer's worth of insect macro photography (and get to a backlog of archived photos) by posting some of my favorites.

It took a while to get a photo of this guy. Grasshoppers like to split whenever something large, like, say, a photographer with a large camera, lens and flash setup strolls through the meadow. Mr. Hopper hid from me behind a blade of grass. As I moved into position, he would peek at me and move back behind the blade.

After a few rounds of peek-a-boo, he showed his entire face to me and I got the shot. What I love about it, besides the even lighting on Mr. Hopper and the focus on his face and foreleg, is what appears to be sunlight falling on the blade of grass. It's not. It's the flash. The blade of grass was angled in such a way as to catch the light from the flash on both sides. The shadow of Mr. Hopper is actually on the other side of the blade -- being somewhat translucent, you can see the shadow.

I also got the anntenae in fairly sharp focus. I've found that one of the bugaboos of insect photography is that you tend to lose one of the anntenae no matter what you do. Depending on the angle from which you are shooting, it will appear as a blurry line across the head or body of the insect. I hate that.

It's always nice when everything comes together just right.

Photograph © 2009 James Jordan.

Monday, March 02, 2009

Bling it on

Rings 'n' things - 2
I’ve been cooped up inside a lot lately. Not able to get out and get any naturey-type shots. Not that late winter/early spring is terribly inspiring here in the upper Midwest. What isn’t white is brown. Ah, well. Eighteen days until spring.

So in the meantime, I’ve been tinkering with my Home Depot-inspired studio lighting setup, and am just about ready to take it out on the road for some portrait sessions. Along the way, I got a chance to shoot some bling shots as part of an engagement photo package for a lucky couple (lucky that they’re getting married, not necessarily lucky that they have me for a photographer).

So I thought I’d post a few samples of the bling shots and a couple of self portraits to show you what can be done with a four-foot fluorescent light fixture, daylight-balanced tubes, a reflector, and a beat-up 25-year-old flash unit. The portrait background is fabric that was on sale at Jo-Anne’s held up by a frame built with less than ten dollars’ worth of PVC pipe from HD and held in place with three spring-loaded hand clamps that cost 98 cents each.

The ring shots were taken with the same basic setup. The top shot shows the ring on a mirror. A white sheet of foam board was used to reflect a white background. The ring and Bible shot was lit by a small LED flashlight.

Me, myself and ...

Chic on the cheap. Gotta love it.

Photo blogging: Sure, I’ve shot pictures of waves. It’s tricky. You gotta time them just right. You’ll wind up with very few keepers -- most of your shots will look cruddy. Now I’ve just discovered another trick to photographing surf. Instead of photographing breakers from the outside looking in, you really have to photograph waves from the inside looking out. And that’s why I will never be an outstanding wave photographer. Be sure to check out the site's home page, which shows the photographer at work. That little teeny person in the lower left of the picture holding the yellow thingy about to be clobbered by a 20-foot wave - that's the photographer.

Photographs © 2009 James Jordan.

Friday, February 27, 2009

Hungry and homeless?

Hungry and homeless

I took this photo back in July. It was on State Street in Chicago and my daughter and I were in the city for the morning. We had brought a sack of food with us and still had quite a bit left over after we had finished eating, so I gave what was left to a homeless man at State and Madison.

We passed this girl several blocks south and my suspect-o-meter went off. She looked too well groomed and dressed to really be in need. A nice jacket lay nearby in case the morning air got too chilly. It was slung over a fairly large backpack. She sported a nice set of shades and was probably trying to conceal an iPod. And the sign - neatly lettered, with swirlies, no less. And she was working a Sudoku puzzle. What homeless person does that?

I'm now approaching my sixth month of unemployment. And I'm not as judgmental as I was back on that July morning in Chicago. These times have created a whole new class of the homeless. And that includes people with nice shades and who know how to work a Sudoku puzzle.

Photograph © 2009 James Jordan.

Friday, February 20, 2009

A word about lighting hardware

Antique camera, detail

I spent some time yesterday working on my studio lighting techniques. The only problem is that I don't currently own any studio lights. Up until the last few months, I've been a natural light kind of a guy. I've had a few still life photos rejected by iStock because they weren't up to par with photos taken with a bank of lights and soft boxes. Ok, fine.

I came across the blog of a pro photographer who uses some unorthodox (and cheap) lighting methods. He also shoots for some big time clients. And his photos are good. I'm sold.

One trick - he frequents that well-known photography supply store, Home Depot, where he picked up a couple of 4-foot fluorescent light fixtures and some daylight-balanced tubes. Instant studio lights. I did the same, and got a two-light fixture for about nine bucks plus tubes.

For this shot, I set up the fixture vertically to the camera right and took some test shots. The fixture lit the antique camera well (a Kodak Brownie Box Camera from about 1910), but the twin tubes created two streaks of light in the camera's lens, which I found distracting. I have a round five-way reflector (you can get one for as little as $50 at a camera shop that carries them) in which one of the ways is white translucent. I placed that in front of the light fixture to ty to soften the light. Perfect.

A piece of white foam board to the camera's left reflected some light into the shadow side and a flash unit bounced off the ceiling rounded out the lighting for this shot, which is very nearly SOOC (straight out of camera). Just a very small amount of levels adjustment and cleaning up some dust specks on the mirror was all that was needed.

I'll probably be heading to the Photo Home Depot soon for another fixture. Next step, portraits.

Click on picture to enlarge. Photograph © 2009 James Jordan.

Tuesday, October 21, 2008

New kid in the neighborhood

Young pine in the forest - Peninsula State Park, Door County, Wisconsin. Took a drive through the park, stopping often to shoot pictures. The morning sun played peek a boo with the cloudy sky, but came out long enough to backlight this little pine tree for me. Tried to contrast the little guy against the giant trees in the background. A photo of potential, the promise of things to come.

Click on this post's title to see image EXIF data. Click on picture to enlarge. Photograph © 2008 James Jordan.

Thursday, August 21, 2008

A few bugs in my studio setup

Hmm … here’s an idea for a photographic niche – studio portraits of insects. Maybe, maybe not.

The north side of my garage has brick halfway up. Where the brick meets siding is a narrow ledge. Placing a black sheet of foam board on that ledge (and using an outdoor light fixture to keep it in place) makes for a dandy little studio for shooting macros. I’ve set it up to shoot various subjects many a time. Being on the north side of the house, the light is always good, no matter what time of day.

I was clearing some brush from my backyard last weekend when I discovered this aging cicada among the twigs and leaves. Cicadas are the bugs that make that eerie whining sound you hear in the trees during July and August here in the Midwest.

Being late August, this guy’s days were numbered, and it was very likely that he had fallen from a tree and was living out his final hours. He stubbornly held on to a decayed branch, and I took several shots from different angles on the ground, but couldn’t quite catch the golden flecks of color on his head and back. Then it hit me – take him to “the studio.”

I set up the black foam board on the ledge and grabbed two cans of spray paint, which I used to hold up the Cicada’s stick. I took a couple of shots on aperture priority (my default) until I found a setting that produced a good exposure. I then switched to manual and locked the camera onto that setting so the black background wouldn’t fool the camera’s meter and I shot away.

The setup allows me to get great pictures and the occasional stare of a neighbor, but really, I think they’re used to seeing me do some strange-looking things with a camera in my hand.

Click on picture to enlarge. Photograph © 2008 James Jordan.